Pop Art Converter
 inside Photoshop issues guide, we will learn how to easily and quickly develop a pop art effect with the Lab color mode. The complete impact takes just a few tips and a short while from beginning to end.
Listed here is the picture i will be using for this tutorial:
The original photo.
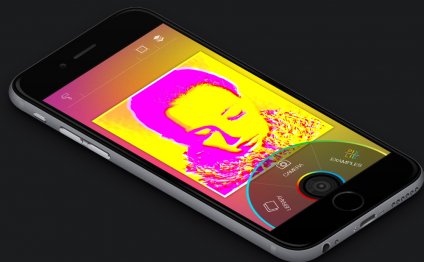
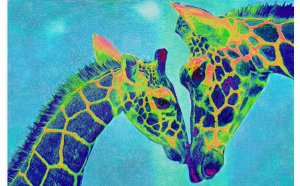
And here's the finished result:
The final result.
Why don't we get going!
Step 1: Convert The Image To Lab Color
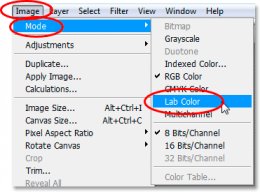
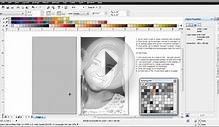
The first thing we need to do is convert our picture into the Lab shade mode, that will be planning to split the colors inside image from the luminosity (lightness) values. To do that, go up into the Image menu at the top of the display, select Mode, then select Lab colors:
Select Image > Mode > Lab colors to convert the picture into the Lab color mode.
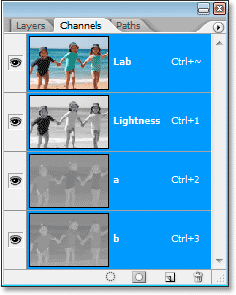
 absolutely nothing will appear to have happened towards the image in the Document Window, but switch-over to your networks palette, which will be grouped in beside the Layers palette, and you'll note that your image is consists of three channels - a Lightness station, containing the luminosity information, as well as 2 color stations, and b:
Choose Image > Mode > Lab shade to convert the picture toward Lab shade mode.
The "a" station presents most of the colors into the image from green to magenta, while the "b" station represents all the colors from blue to yellow. We're going to use these two color networks to rapidly create the colors for our pop art-style effect. Plus in case you are wondering, the "Lab" channel towards the top isn't actually a channel anyway. It is simply the composite of the three other networks.
2: Apply The "Posterize" Adjustment toward "a" Channel
 Click regarding the "a" station inside Channels palette to choose it. Your picture in the Document Window will change gray and look instead strange, but that's okay. Go up toward Image menu once more at the top of the screen, select Adjustments, and then select Posterize down near the bottom associated with the number. This may talk about the Posterize dialog field:
Go to Image > changes > Posterize to bring within the Posterize dialog package.
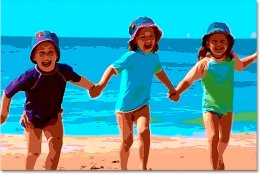
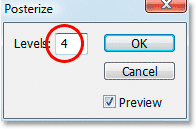
Enter a worth of 4 for the Levels option, then click OK. Click on the "Lab" channel near the top of the Channels palette to carry straight back your full color image inside Document Window, and your picture will now look something like this:
 Click regarding the "Lab channel" in the Channels palette to see what your picture seems like after using the Posterize adjustment into the "a" station.
Step three: Apply The "Gaussian Blur" Filter towards "a" Channel
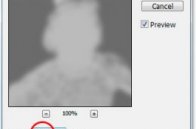
Simply click back from the "a" station yet again to pick it. We will erase the colors with the Gaussian Blur filter. To achieve that, aided by the "a" channel selected, go up into the Filter menu near the top of the display, choose Blur, and then choose Gaussian Blur. This introduces the Gaussian Blur dialog package:
Check-out Filter > Blur > Gaussian Blur to bring up the Gaussian Blur dialog field.

RELATED VIDEO
Share this Post
Related posts
Pop Art Animals
Gaining not merely United states, and European attention, Katharina Fritsch joined the world of the art globe and rapidly…
Read More
Pop Art design movement
Pop art is a skill activity that surfaced in the mid-1950s in Britain plus the belated 1950s in america. Pop art offered…
Read Morelatest post
-
 FILM NOIR German Expressionist July 25, 2024
 -
 Expressionism Dates July 17, 2024
 -
 Pop Art famous Paintings July 9, 2024
 -
 Modern Art Abstract Expressionism July 1, 2024
 -
 Famous Pop Art Andy Warhol June 23, 2024
 -
 Australian female Painters of the 20th century June 15, 2024
 -
 Popular Pop Art artists June 7, 2024
 -
 Andy Warhol Pop Art Gallery May 30, 2024
 -
 Create Pop Art Photoshop May 22, 2024